> For the complete documentation index, see [llms.txt](https://mappy-docs.tech-arms.io/llms.txt). Markdown versions of documentation pages are available by appending `.md` to page URLs; this page is available as [Markdown](https://mappy-docs.tech-arms.io/getting-started/advanced-features/dealer-form.md).
# Dealer Form
Find new dealers, expand your network, and manage dealer applications directly on your store.
### ❓ Why is this needed?
For stores with multiple dealers, without a Dealer Form, store owners must manually create forms, verify information, add addresses, and send emails.
The Dealer Form automates these tasks, saving time, reducing errors, and improving efficiency for both customers and store owners.
### 🔍 **How to Access Dealer Manager**
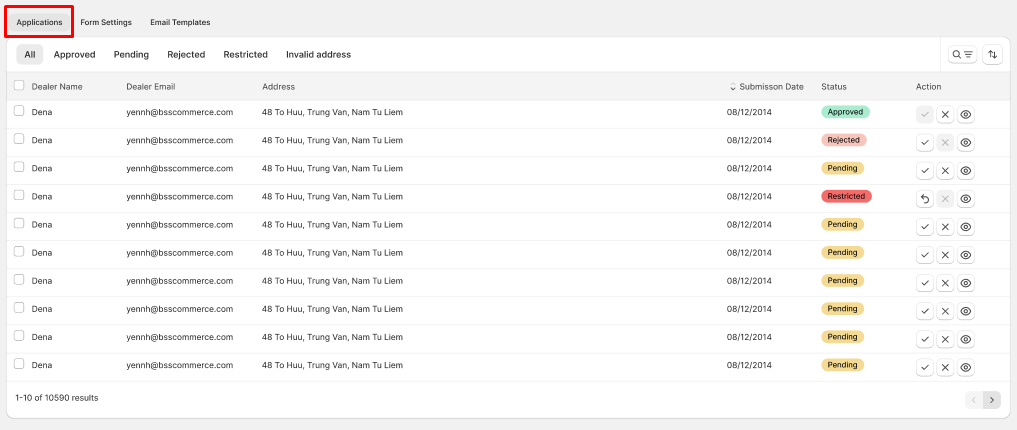
To get started, click on the **Dealers** tab in the left sidebar. You’ll find three sub-tabs:
1. **Applications**: Review and manage dealer submissions.
2. **Form Settings**: Enable and customize your dealer form.
3. **Email Templates**: Set up automated responses for dealers.
***
### **Step 1: Customize and Enable Your Dealer Form**
The **Form Settings** tab is your starting point for setting up the Dealer Form.
#### 1.1 Dealer page configuration
* **Dealer form**: Click **Activate** to enable the form.
Once activated, a dealer page will be created at the default link: **yourshopifydomain/pages/dealer-form**, allowing you to view live changes. To customize the URL of this page, follow these steps:
1️⃣ Go to **Pages** in your Shopify admin and click on **Dealer Form**.
2️⃣ Scroll down and click the edit button
3️⃣ Update the **URL handle** to your desired link.
Step 3
#### 1.2 Field Editor
📇 **Contact Information**: Fields for the applicant's personal details, including Name, Email, and Message. This information is solely for your review and contact purposes and will not be displayed on their store profile.
🏪 **Store Information**: Fields for the dealer's store details, such as Store Name, Address, Website, and more. These details will be reviewed by you and displayed in the store's profile once the application is approved.
**How to Edit Fields:**
* Use ➕ **Add Field** to add additional fields. The menu opens on the system fields you have not used yet; pick **Custom fields ▸** to build one of your own, and **◂ System fields** to go back.\

* Click the **X** next to a field to remove it.\

* Click on a field to modify its **label text**, **placeholder**, **help text or required field.**
* Drag a field to change the order applicants see it in.
**Custom field types**
Ten types are available: **Dropdown selection**, **Multiple checkbox**, **Radio option**, **Text field**, **Text area**, **Heading**, **Number**, **Date field**, **File upload** and **Action button**.
Each one is configured with a **Label text**, plus the settings its type needs — **Help text** and **Place holder** for the text-like types, **Option text** and **Value** for the ones that offer choices, **Heading type**, **Date type**, or a **Link** for an action button.
🛑 **Note:** Fields in Contact Information can not be removed. Default required fields include: Name, Email, Location name, Address. A form holds up to **35** fields in total — system and custom combined — and the app tells you when you reach the limit.
#### 1.3 Form Content
Edit the wording applicants see:
* **Title**, **Description** and **Submit button**.
* **Success message** — shown once the form is sent.
* **Thank you message** and **Call to action button** — what the applicant reads and where you send them next.
**Reset to default** puts any of this back to the app's original wording.
#### 1.4 Custom CSS Form Code
* Advanced users can use this section to style the form with custom CSS.
***
### **Step 2: Set Up Email Templates**
Once your dealer form is ready, go to the **Email Templates** tab to customize automated email responses. There are three templates:
* **Approval email template**: Personalize the email sent to approved dealers.
* **Rejection email template**: Customize the message sent to applicants whose applications are declined.
* **Notification email template**: The email you receive yourself when a new application arrives — it goes to the address set under **Notification** in Form Settings.
Each template carries an **Active** / **Inactive** badge with an **Activate** / **Deactivate** button, so you can turn a single email off without touching the others.
**Fields in the Email Template**
1. **Subject Line**: The subject of the email that recipients will see in their inbox.
2. **Preview Text**: A brief snippet that appears below the subject line in the recipient's inbox.
3. **Sender Name**: The name displayed as the sender of the email, such as your store's name.
* Default: Your store's name is used as the sender name.
* You can edit this field to a custom sender name if desired.
4. **Reply to Email**: The email address where recipients can send their replies.
* Default: Your store's email address is used.
* You can update this to a custom email address if needed.
5. **Email Content**: Customize the email body, and drop in a variable wherever you want the application's own details to appear. Click **Add variables** above the editor and pick one — it is inserted where your cursor is.
**Variables in the Approval and Rejection emails**
* **{{recipient\_name}}** — the dealer's name.
* **{{location\_list}}** — the approved or rejected address.
* **{{sender\_name}}** — the sender name you set above.
**Variables in the Notification email**
* **{{applicant\_name}}** — the applicant's name.
* **{{applicant\_email}}** — the applicant's email address.
* **{{applicant\_message}}** — the message they wrote.
* **{{application\_url}}** — a link to the Dealers page in your app admin.
**Location variables — available in all three templates**
Under the **Location** group of the **Add variables** menu: **{{location\_name}}**, **{{location\_address}}**, **{{location\_additional\_address}}**, **{{location\_city}}**, **{{location\_state}}**, **{{location\_zip\_code}}**, **{{location\_country}}**, **{{location\_phone}}**, **{{location\_email}}**, **{{location\_website}}**, **{{location\_fax}}**, **{{location\_description}}**, **{{location\_tags}}** and **{{location\_products}}**.
Good to know:
* A field the applicant left empty, or one you removed from the form, comes out as nothing. Any wording you typed around the variable stays, so a label can end up on its own with no value after it.
* A misspelled name is left in the email exactly as typed, which is how you spot it.
* Variables are replaced in the email body only — not in the **Subject Line** or **Preview Text**.
> **Tip**: If you've made edits but want to revert to the default email content, simply click the **"Reset to default"** button.
***
### **Step 3: Publish and Share Your Dealer Form**
1. **Test Your Form**: After enabling the form, visit your storefront to ensure it’s visible and working correctly. If there's any issue, please don't hesitate to contact us via chat or [**support@tech-arms.io**](mailto:support@tech-arms.io)
2. **Make It Accessible**: Add the Dealer Form link to your site navigation (header/footer) to make it easy for potential dealers to find.
3. **Put the form on another page**: the form has its own page, but you can also place it anywhere else in your theme. In the Shopify theme editor, add the **Dealer Form** app block to the page you want. **Settings → Installation** shows whether the block is **Added** or **Not added**, and the **Add Dealer Form block** button takes you straight to the theme editor.
4. **Promote Your Form**: Share the form link via email or social media to attract more dealers.
***
### **Step 4: Manage Dealer Applications**
After receiving submissions, head to the **Applications** tab to review and manage them.
**Actions You Can Take**
* ✅ **Approve**: Accept the application, adding the dealer to the **All Locations** tab and displaying their store on your locator map.
* ❌ **Reject**: Decline the application.
* 🖊️ **Edit**: Modify the details submitted by the dealer.
* 🗑️ **Delete**: Remove the application permanently.
Approved dealers can be managed further in the **All Locations** tab, where you can update their store details.
**Export your applications**
**Export**, next to the tabs on the **Applications** tab, downloads every application as a CSV file.
* All statuses are included, not only the ones your current filter shows.
* A column appears only when at least one application has something in it, so the file stays as narrow as the details you actually collect. Your custom fields each get their own column.
* The column names match the Locations export, so the two files can be compared side by side.
***
### 💡 **Tips for Success**
1. **Optimize Form Placement**: Make sure your Dealer Form link is visible on your site, such as in the header or footer.
2. **Keep It Simple**: Only ask for the most essential information to avoid overwhelming applicants.
3. **Respond Promptly**: Regularly check the **Applications** tab to approve or reject submissions quickly.
4. **Personalize Communication**: Use customized email templates to maintain professionalism and build relationships.
#### Leverage *Customer Search History* Data and expand your reach
Are you looking to attract customers within a specific location? Consider identifying potential retailers in the area who can become Dealers for your products, and share your demand data with them to demonstrate the potential demand for your products.
{% content-ref url="/pages/Kzq9mxeCa6JDMHmx1GqT" %}
[Search Records](/getting-started/advanced-features/search-records.md)
{% endcontent-ref %}
***
If you have any related questions, please contact us via **Live chat** or [**support@tech-arms.io**](mailto:support@tech-arms.io) for further assistance.